Showing posts with label goodies. Show all posts

Friday, February 14, 2014

Whoohoo! I'm POSTING!

:D

See? I remembered and kept to my deadline ;)

And thank you to my reminders - Even though I didn't need the nudging and poking THIS time, I'll probably need it the next.. or the one after that. So if you notice the week drawing to a close and no new post from me... ;)

Anyway, I had a three day to-do list that consisted of JUST cleaning/sorting my office/stash area, doing this blog post, and baking. The baking is in progress ( it was supposed to be done on the first day so I could eat the muffins for breakfast.. but instead I ate the last three eggs then couldn't bake until I bought more.. and today was the first day I was at a store .. See? not REAAAALLy procrastination on that one ;) )

.... and the blog post is right here...

... the cleaning... the only things moved were for me to access stuff for this blog post >.< I WILL get it done. I WILL. sooner or later... usually later, but still, it WILL get done!

So, what have I been making jewelry wise?

Nada.

I had four V-day type braclets on the go.. then the chain on the one proved to be absolute crap... the same chain is on two of them, and I didn't discover this until both bracelets were three quarters done... so  they got shoved aside in a bit of a minor tantrum... right into the first two that had made it about half way done, all pretty dangles and beads done with gold accents to go on a gold chain... when I discovered I was out of the right sized gold coloured chain >.< All I had was a big chunky one that was too big, and a fine one that was too fine... but that I used for the other ones and it turned out to be crap anyhow >.< so again, not really procrastination on those... merely frustrated refusal to touch them until I have the right sized chain.

My modpodge experiments were halted after that first batch due to my needing my table for other stuff, and it was the project set up that would give me the most room the quickest. I'd hoped to have a couple decent podged pendants made to add in to the giveaway, but maybe next time. Ditto for my clay experimenting.

Okay... now I DID promise a giveaway.. but while putting the one batch together, I decided to do a second as well ;)

So first up we have a little bundle since it's V- Day.

So all the beads in the center are pairs, the ones on the bottom are singles, and then there's a nice sizes piece of cord :) All of the beads are glass. Now, since it's for V-day, and I didn't have any hearts to include, I'll see if I can't have a heart or love-inspired pendant made in time for it to be mailed out to the winner. not sure on what it'll be made of.. could be wood, could be clay, could be... whatever I decide to play with ;) If I don't have anything good enough to send made, I'll substitute a pendant of some type form my stash.. it just might not be lovish-type-stuff ;)
 

And for the second... which I considered doing on a different day, but then it kinda defeated the purpose.. ditto theV-day one.. so... number 2...

The 'Back to Work' giveaway
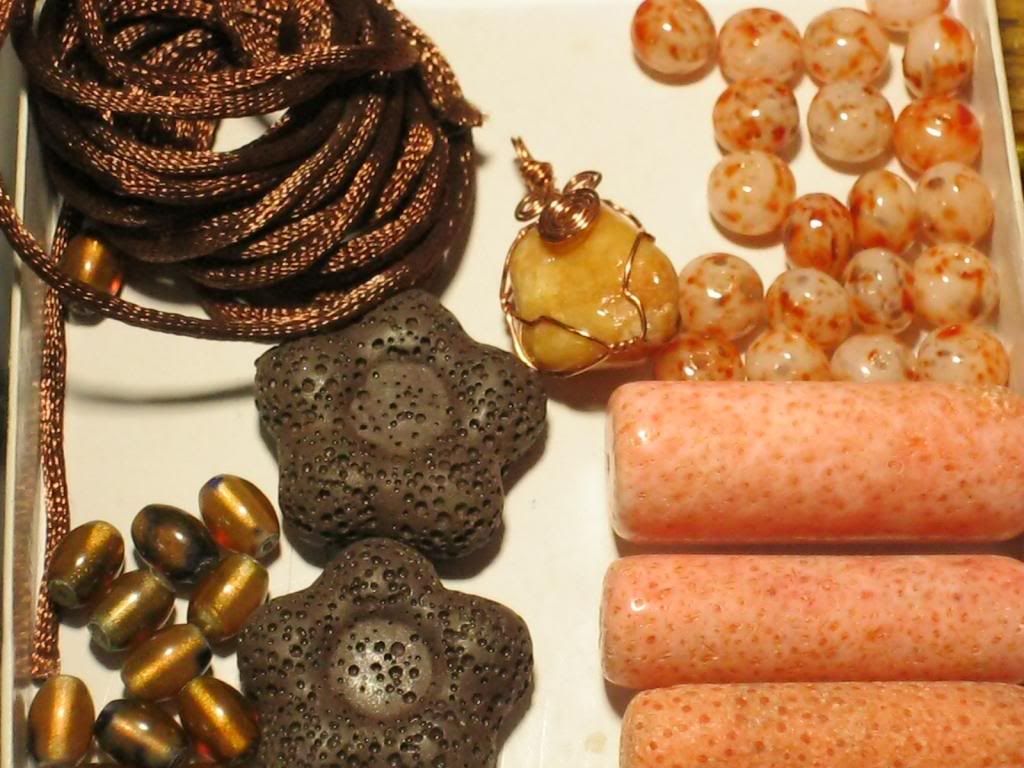
' Okay, now those two big peachy/orangy tubes kinda feel like stone, but the bottom one is definitely polymer, as are the two brown flowers. The speckled orange beads and the goldy/brown beads are all glass, and the pendant in a copper wrapped stone I collected from a local beach and polished up and sealed :)

Okay, so  the 'Back to Work' bundle is done through rafflecopter


How do you win the Valentine's one, you ask?
Simple - leave me a comment below and tell me if you have plans for today/tonight .. or if you'll be checking out the 1/2 off V-day goodies tomorrow with me ;)
I'll do a random drawing for the winner Monday, Feb.17th ( Family Day here in Canada, so it'll be an evening/night posting ;)


Thursday, November 8, 2012

Post Office Day& Envlope Tutorial

...yup... that's what today was...

Today I spent the entire morning  making envelopes, addressing them, stuffing them, then filling out customs forms.... sixteen of them to be exact. Then I went to the post office, where I handed them all over in order of weight/size to make it quicker... then one of her coworkers helped slap the sticky parts on while she input all the info and weighed them. 

Why so many? Well, I saved up all the giveaway stuff from October to do at once... plus there was one left over from September that didn't get me her info on time, and a couple from just this week that I slipped in there too.

Don't believe me?  Here's SOME of them...I actually did up four or five more after I took this picture.


The giant butterflies are photoshopped in to hide the addresses ;)

So Pam, Kristen, Tiffany, Jami, Kimberly, Marla, Gina, Zan, Rita, Susan, Jennifer, & Beti  .... your giveaway goodies are in that pile there. Along with two prizes for Marlene Cupo's Non-Blogger & Blogger challenge at BSC, a thank you to Marlene for starting it & hosting it, and one PIF.

So all of you I just named, watch for the butterflies in your mailbox... I didn't stick any notes in them to let you know what it is... I was lazy >.< lol So  butterflies = goodies from Skye ;)

AND... since I made all of those, I took pictures to give you a simple tutorial on how to snazz up your mail, or recycle those bubble envelopes :)


    First off, you'll need the following items :


Pretty paper - here I'm using butterfly giftwrap
tape
scissors
gluestick
envelope - I'm using a new one in this photo, but you can use an old one as well... trust me, several of the packages in that photo above are recycled bubble mailers.


Lay your envelope on top of the paper to measure how much you'll need. 

I cut a long strip to fold up from the bottom, leaving the top open.


Take your glue stick and run it around the outer edges on the BACK of the envelope first, then across the middle in an 'x' . I find this gives good coverage, but you can cover the entire envelop if you want.

No, my glue isn't pretty colors...I just photoshopped it to show where the glue is....if you look, you can see that the glue covers MORE than just the colored part.


Place glue side down on the paper, putting the edge of the flap at the edge of the paper. Smooth it down so it sticks firmly. 

Add glue to this side as well, stopping at the edge of the ENVELOPE .. do NOT glue the flap.

Add this point, if you want to, you can fold the side in to make a nice crisp edge. I didn't >.<


Your envelope should look like this. 
Trim the edge around the flap. Fold the sides of the paper in to fit the envelope.  IF you folded the edge inside in the last step, you'll only have the one layer to fold over, and it will be considerably neater. If you didn't (like me), you can trim one side to make it shorter, then fold the longer piece over top. 

I taped all the sides down for security, but if you feel your glue is strong enough, you could just glue them.


 So now all your paper edges are folded and secured, and you have a completely covered envelop. 
Write the addresses out on plain white paper and tape them in place - this lets the address stand out from the picture.
I COMPLETELY cover the address with tape to seal the ink to prevent it from smudging and becoming difficult to read.


You now stuff it with whatever  you're putting in it,  fold and stick the flap ( I tape it down as well... extra secure ;) )   And you've got a pretty package already to go!

If you're using a 'pre-used' envelope, leave about an inch of paper extra to act as the 'new' flap to seal your envelope when it's done :)

Easy Peasy :)  If you have spray adhesive, this would be even easier...I don't ;) I think I'd make waaaay too much of a mess with that.. but that's just me :)

So now you know, if you open your mailbox and see a pretty package with butterflies on it, it's from me :D
I also have rainbow paper with butterflies on it... I used up an entire roll of the blue and white paper today and went to buy more...but they were out >.< so I got the rainbow butterflies instead ;)


~ Skye